Trying out the new Canon camcorder, but cannot import the MXF files into FCP 7 on Mac Yosemite 10.10? This is an easy guide to transcode Canon MXF to Apple ProRes MOV for successfully importing MXF file to FCP 7 for extending editing.
As we know, Avid works natively with a few Canon MXF files but not FCP 7. Final Cut Pro X was only be available to customers through the Mac App Store.
"Anyone have any luck importing native from Canon XC10 camcorder? - I am running Yosemite and FCP 6 10.0.5........Wonder if anyone has a recommendation for cleanest situation other than native if they have been using it with FCP 7 all ready?"
"How do I import Canon XF305 .mxf files into Final Cut Pro 7? This is the latest and greatest software right? There must be a way. Help Please."
From Final Cut Pro 7 official page you will know Apple ProRes codec is native editing codec, so you just need to encode Canon MXF to Apple ProRes codec, and then you can import MXF files into FCP 7 for editing natively on Mac Yosemite.
MXF Converter for Mac (Review) is the most efficient solution to encode Canon MXF to Apple ProRes for Final Cut Pro 7. This program utilizes all cores to achieve 10X faster conversion speed. I can directly load multiple MXF from different folder and do batch conversion at once. Since many converters only allow me add Canon MXF file one by one, I appreciate this feature much. What I must mention here is the batch conversion and "Shutdown the Computer" set are really helpful when you are dealing with large amount of files.
Another high light of Canon MXF Converter for Mac is it solves audio issues when transcoding MXF to FCP 7, such as audio out of sync, audio missing and audio cut-off. I learn that the program can automatically load audio counterparts when I load MXF file. After MXF to FCP 7 conversion, the output format will be with audio too. I accidentally click "edit" icon in the main interface and I find I can preview original file and output video simultaneously. Here initial editing, such as cropping, trimming and deinterlaing, are available. Adopting advanced audio/video synchronization technology, The Pro can guarantee perfect audio and video sync after editing and conversion.
Below is a simple tutorial to help you Import MXF to Final Cut Pro 7 with Apple ProRes codec on Mac.
Download a free trial of Canon MXF Converter for Mac


How to re-encode Canon MXF to Apple ProRes for using in FCP 7
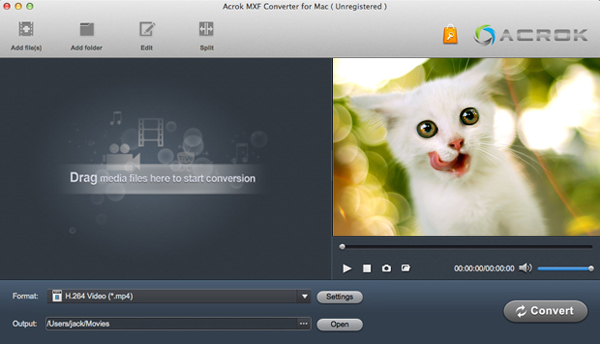
Step 1. Import or Canon MXF file to MXF Converter for MacYou can import MXF content via clicking "add video" or "add folder" in the upper corner or just drag file to the program directly.
In this step, you may encounter that source with just video but no audio. A suggestion is to click "add folder" to load the entire MXF whole structure folder to avoid of missing audio caused by metadata loss. And it's better to preview the raw MXF files in the preview window to avoid of no audio in output MOV.
Step 2: Select ProRes 422 as export format for FCP 7
Click "Format" and under the "Final Cut Pro" menu, you can clearly see proper formats for FCP 7, among which, native codec to read MXF files in FCP 7, including ProRes 422 and ProRes 4444. You can also directly enter FCP in the search bar, even faster. You can select one as target format depending on your request in post production.
- Apple ProRes 422 – Higher quality than Apple ProRes 422 (LT);
- Apple ProRes 422 (HQ) – Keep original video quality for editing in FCP;
- Apple ProRes 422 (LT) – Get a smaller file sizes than Apple ProRes 422;
- Apple ProRes 422 (Proxy) – SD levels – 480i/p and 576i/p. Used in offline workflows.
- Apple ProRes 4444 – Edit and finish 4:4:4 material.
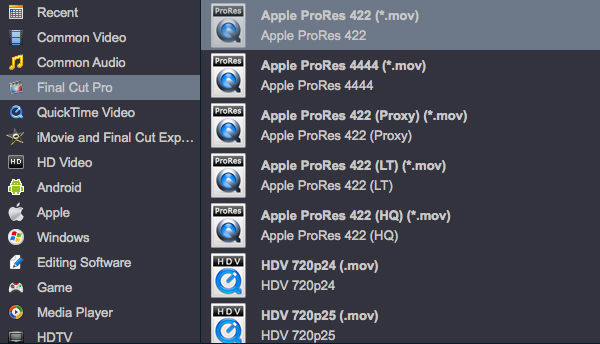
Actually, different Apple ProRes codec corresponds to different needs. ProRes 422 HQ is recommended here for offering even greater headroom to preserve the quality.
Tips: Some users may encounter the problem that when they try to convert MXF to ProRes for FCP 7, Acrok software just finishes the conversion at about one or two seconds, then generate 0kb files. This may because you don't install the FCP 7 in your local place, MXF Converter for Mac need to use the codec from FCP to do the encoding thing.
Step 3: Set proper frame rate for output ProRes 422 MOV
Set proper frame rate is important. The video frame rate is up to 60fps under the ProRes 422 format profile settings. After much verification, here suggests 25P in PAL (30p in NTSC) to keep high video quality and smooth edit in FCP 7. Before, you can also adjust other settings, like video size, video bitrates, audio channels, etc.
Step 4. Start Canon MXF Conversion for FCP 7
Press the "Convert" button to start encoding Canon MXF to Apple ProRes 422 at high speed on Mac OS X 10.10 Yosemite, 10.9 Mavericks, 10.8 Mountain Lion, 10.7 Lion, 10.6 Snow Leopard.
Now, just wait until the conversion finished, then, click "Open" to get generated Apple ProRes files for using in Final Cut Pro 7 with optimum performance. Hope the MXF to FCP 7 Converter for Mac really helps. Thanks for reading.
Canon Mac MXF Converter is not only a MXF mixer and converter, but also a simple and easy MXF video editor.
But please note that currently you can't edit videos if choosing Multi-track output formats.
On the Editor Window, you can play and preview the original video and output effects. On the buttons bar, you can flip video, trim, add 3D effect, reset, or adjust volume.
And in the tabs, you can do more detailed editing.
Trim: You can trim off unwanted parts from starting and ending. You can either drag pointers on the process bar or set exact time point in Start and End boxes to set.
Text Watermark: Checking Enable, you can add text watermark on the video. You can either set parameters or drag the text on preview screen to set its location.
Subtitle: In this tab, you can add *.srt, *.ass, or *.ssa subtitle files to the video as hard subtitles.
Image/Video Watermark: In this section, you can add images or videos as watermark. The location can also be set by dragging on the preview screen.
Effect: Here you can add 3D or other special effects, or correct color by adjusting brightness, contrast, and saturation. You can also set to deinterlace here.
Audio Editor: You can either replace original audio or set audio fade in/out effects.
Crop: You can drag the edges on play window to specify or adjust parameters. You can also click the human button to switch to advanced mode. And then you can set display aspect ratio as well as output ratio and output mode.
No comments:
Post a Comment